Thursday 26 February 2015

Mixed Media thank you card

Hello and thanks for coming by here. Sorry about the boring post title, but I could not think of anything more interesting...
I needed a card to say a special thanks to someone, so I pulled out some of my new Indigo Blue stamps (thank you Jenny of inspiring me to get these!!) I also used  the Tim Holtz Layered Leaf die and had a play.

I started with a piece of water colour paper, a variety of mica and Distress Stain Sprays and created a background using the cling film technique.
For those who don't know the technique, it's dead easy. Create a wet background, using whatever medium you like, water colours, Aquatints or sprays. Let them mix and puddle and then cover your piece with some cling film that you crease to create textures and patterns. Put on the radiator to dry (or leave overnight) and you get the most wonderful effects. To be honest, I actually ruined the background above by adding further layers and splats afterward, because I wanted a dark background behind my leaf, but as I was going to cover it anyway, I did not mind too much. Below is a close up still where you can see a bit more of the effect:
I cut and embossed the leaf from another piece treated in the same way.
I added some copper mica splats and crackle stamping to it too.
Before adhering the leaf to my substrate I added some background stamps to the piece, using these new Indigo Blue stamps. They are designed by Limor Webber and are just perfect for journaling and mixed media.
All I then did to finish the card was to add a flower cluster and some text taken from the new Tim Holtz  small talk stickers, mounted on some black card.
Some shadow, created with a Stabilo All pencil finished it all off.
Well, that was about it.. Hope the recipient likes it, - it turned out a bit gloomy in colour, but then it was such a cold and dark day when I made it, that I think I was affected by that.

Thank you for visiting like always. Not long until March now, and hopefully here in the Northern Hemisphere some warmer days will soon be on their way.

Monday 23 February 2015

When Tim and Sheena go out to play....

Hi everyone, lovely to have you joining me here for a bit.
Today I am sharing a quick tag..... Some of you have noticed that it's been a bit quiet here lately, yes I am not managing to post as often as I used to. There are many reasons for that, but one of them is that I have been very busy behind the scenes, creating for a new release of Sheena Douglass. But today I wanted to do something just for myself, using some of my new Tim Holtz goodies. As some of Sheena's things were still flying around on my craft desk, I thought I'd use these as well, but more in a Tim style.

Here are a few details:
I used one of my new Thinlits mixed media dies and layered up various bits and pieces. The background was made using Distress Spray Stains in Iced Spruce, Pumice Stone and Gathered Twigs. I then inked with the same colours and also added some embossing powders along the side. One of the new Photobooth images is the focal point, - love their size, and so many all in one pack, enough for hours of creating....
A ticket cut from some Prima Cartographer paper and a butterfly stamped in Potting Soil Archival from one of Tim's framelets sets,
A word from the new larger chit chat stickers, distressed and scuffed up a bit. A great size, I love them!
And here a couple of the new Sheena perfect partners dies and stamps (these were released in January already and are available from Crafters Companion). The dies match the stamps to perfection. I cut them from Prima cartographer paper again. and chose a heart charm that would match my colour scheme.
Well that's it for just now. You can expect to see lots of more traditional Sheena Douglass cards using her brand new, not yet released products as from the beginning of March. They won't be my usual grungy mixed media style, but hey, sometimes I love to step out side of the box and I had great fun creating them, - stay tuned....

Thanks for visiting today, and I will be back on the 1st of March with 3 projects..... hope to see you then and stay inky!!!

Friday 20 February 2015

Special Numbers for a Vintage Journey

Hi everyone and thanks for popping in. A big warm welcome to all my new followers too, thank you for taking an interest!
I cannot believe it's time for another challenge already at A  Vintage Journey, but, - yes it is and our theme this time is Special Numbers!.
Here's my make:
Here is the challenge description:
So many of Tim Holtz products have numbers, Papers, Stamps, Rub ons, Stencils and Idea-ology to name a few
Incorporate your significant numbers it could be Birthdays, Age, Anniversary or the Lucky ones!
Use them on any project you wish and if possible explain the importance; we would like to see a vintage theme using Tim’s techniques and products where possible.
Well there you go, I made a tag and holder, my special numbers are 3, 4 and 7. There are many reasons for this: They represent the numbers of the houses I have lived in during my life. I have 3 children, we got married in 1974, and specially 3 and 7 have always been magical numbers for me....
Anyway, here is a quick step by step:

I started by making a 4.3/4" by 7" envelope out of Craft card and cut of one of the flaps, then inked around the edges. ( I used a WRMK board, but you can of course use whatever you like).
Next I created a cover piece out of Manila card stock. I coloured with 3 colours of Distress Spray stains and inks: Seedless Preserves, Dusty Concorde and Aged Mahogany, I then ran it through a numbers embossing folder. As the folder was not large enough I made two pieces and overlapped them. I highlighted the raised bits with gilding paste. At the top I cut out a notch to make it easier to get the tag in and out. (The size is just right for a size 10 tag).
Next came the elements to decorate the outside:

I had a birdcage in my stash that I altered with embossing powders to give it a metal look. I used a mix of Stampendous, Ranger Antiquities and Distress  powders.
 I covered an old bit of card with some metal tape, ran it through another folder, cut it with the Baroque Bigz die and then cut out the word Dream with another Sizzix by Tim Holtz die. I then coloured it with various colours of Distress paint and then sanded it back a bit to reveal the metal on the embossed bits.

Next I took one of Tim's large numbers and altered it with the help of some paints and powders. The number is made from black plastic, so you have to melt the powders very carefully, but it does work I found, - just take your time....


Here you can see how I put it all together:
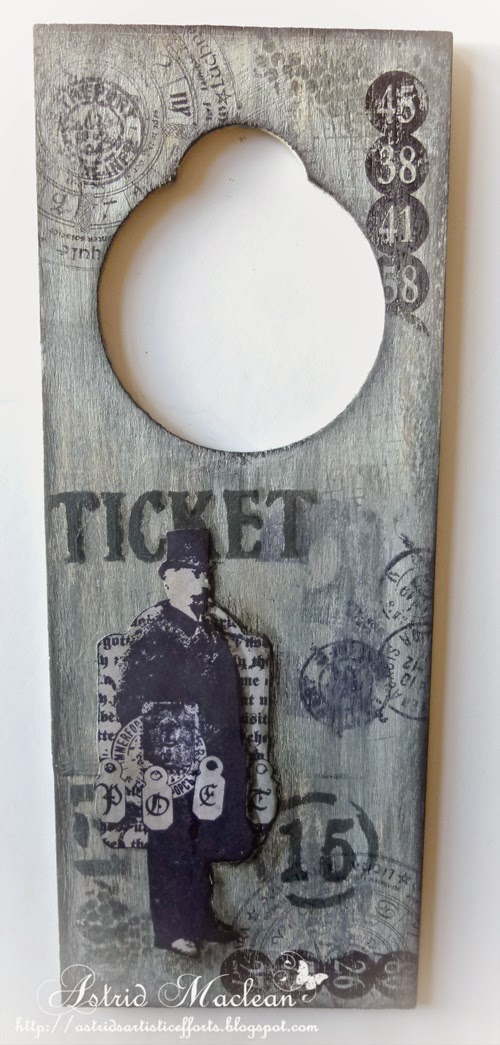
Now for the tag: As the cover was quite bright, I wanted to keep the tag more muted:

I inked the tag with Antique Linen and then stamped the French text background from the Papillion set in Old paper. I then used two of Tim's stencils and stencilled in Gathered Twigs.
I cut and embossed the two butterflies from the new Butterfly Duo die and folder, I also embossed the tag itself positioning it carefully to get the butterflies where I wanted them. This gave me their antennae which the actual die does not have. I inked them with Vintage Photo, Gathered Twigs and Walnut Stain Distress Inks.
A stamp from the Stampers Anonymous Classics 14 set, stamped in Coffee archival, decorates one corner of the tag.

Another stamp (or rather just a part of a stamp) from the same set was given a metal look by stamping and embossing it with a mix of Stampendous powders and mounted onto a piece of tissue tape, in the other corner. I rather like how the word turned out and no doubt will use that technique again...
.Here finally you can see how the tag fits neatly inside its pocket. 
Well, that's it from me and of course we all hope you will play along with the next challenge, which by the way is the final one of our first year, can you believe it? Wow, time certainly does fly.
To see all the details of this challenge and the amazing projects my teamies have made, all you need to do is click HERE and of course we all hope you will play along!!

Wednesday 18 February 2015

A wonderful gentleman...

Hi everyone,
A very quick post from me today, just to share a simple make I had great fun creating.

I was lucky enough to attend the Stitches Craft and Hobby show in Birmingham yesterday, and apart from catching up with friends, spent a very happy hour playing around at the Decoart stand where the wonderful Mark Gould was letting us create make and takes with the gorgeous Decoart Chalk paints.
So I started this piece while at the show and then finished it off at home as I ran out of time.

Mark was kind enough to offer to let me borrow some of his Paperartsy stamps, brand new and never used. Now if that is not kind then what is??? So thanks so much for that Mark and for re-igniting my love for these fabby chalk paints too!!

I created this door hangers with lots of layers of paint, stenciling with some of Andy Skinner's amazing new stencils, wax resist, sanding back and more layers of paint.
This is one of the stamps in the set Mark let me borrow. I had wanted to stamp him on tissue, but because I really wanted him to stick out and be the vocal image, I landed up stamping him on stamping paper and fussy cutting him out.

Here are some further close ups:
I decided to not embellish the hanger any further, so as to not detract from the paints and stamping.
I had such a great time meeting up with friends, that there was very little time left to look around at all the stuff, one day is definitely not enough really, but better than not going at all. So thank you to everyone I met, crafty friends are just the best!!!

Thanks for dropping in like always and have a great rest of the week!!

Sunday 15 February 2015

Think Pink and a big surprise

Hi everyone and lovely to have you drop in! A slightly belated Happy Valentines to you all!!
 Of course I have a project to share, and here it is:

One of my new years resolutions was to enter more challenges, so in the nick of time I entered the Mixed Media Monthly challenge with one of my journal pages.
While there I saw that they were having a design team call which closed the very next day. On a whim I decided to apply, because Mixed Media is my favourite style at the moment. I never thought for one minute I would be picked.... But, as you may have guessed by now, - I was. I was just about in shock when they emailed me.

So today I am introduced on their blog, and  this is my first DT piece I made for them.

It started with a bit of grey board that I covered with two different bits of designer paper and then treated with gesso, some texture paste through a Tim holtz folder and some Lindy's Stampgang Spray in Boudacious Blush. I also added some background stamping.
The theme is Think Pink, so obviously pink had to feature in it.

Next for the embellishments, I started with a wood swirl by Kaisercraft and treated it with numerous colours of Decoart Media Acrylics, in order to get a similar colour as my background paper. I then added crackle glaze and when that had dried Antiquing Cream, also from the Decoart Media line:
Next I took a couple of little wooden butterflies, added a sealant and then crackle glaze again, but it did not crackle for some reason, it just bubbled a bit, so in the end I just coated them with Decoart Metallic Glaze in gold.
Time to put it all together. I took some flowers from my stash, sprayed them with the Lindy's spray and also some Victorian Velvet Distress spray and then layered it all up, onto a bit of corrugated card that had also been treated with some gesso and a few sprays.
At this point I decided I wanted to make it into a little wall hanging, so I took another larger bit of grey board, covered it with some text paper, followed by Gesso some inking and stamping and that was about it.

Here are just a couple of close ups still:
A text stamp from a recent release by Crafters Companion.

As regulars will know, I am not really a pink girl, so this was a bit of a challenge for me, but I had fun making it in the end. If you don't know the Mixed Media Challenge Blog do check it out. My teamies shared wonderful projects already on the 1st of February. There were well over a hundred entries last month and of course we have a sponsor and a fabulous price to be won, so if you have not entered yet, I hope you will!!

Thanks for visiting like always!

Saturday 14 February 2015

Happy Valentines!

Just a super quick post from me to wish all my friends and followers Happy Valentines Day!!

I'll be back tomorrow with a new project, meanwhile, may your day be filled with love and may you find love in your heart to spread throughout the world.


Love you all and thank you for all your support!!!

Wednesday 11 February 2015

Tim's February Tag my version...

Hello lovely visitors, thanks for dropping in here.

Just a quick post from me sharing my version of Tim's February tag:
I won't go into detail as to how I made this, all the instructions can be found on Tim's blog HERE.

I pretty much followed what Tim did, just used different papers as I did not have many of the ephemera left. I also did not want a heart out of felt, so I made mine from chip board, (using his Movers and Shapers heart die) and added some crackle instead. I also added a little scribble instead of the stitching, just for a bit of fun...
I loved the way Tim had added his heart charm to a arrow, so I followed that idea pretty much exactly.

Because Tim's composition is slightly different from mine I found I had no space to add a word band, so I added some of the little letter stickers instead, shading around them like Tim showed on the paper elements. I love this technique and have used it often in the past, it adds so much depth.

Now this year I decided to keep my tags in a pocket book made for the purpose. You can find the instructions for that HERE if you have not seen it yet. This way I get to create a matching page for each tag. So here is my February page:
I used inks Distress Sprays, tissue tape, a stencil and some back ground stamping. The heart was made using the piece of chip board I had cut the heart out of, as a stencil.


Here you can see what the double page now looks like with both the January and February tags inside their respective pockets.
So that was my version of Tim's tag. I have seen so many wonderful interpretations around blog land already, Tim's inspiration is always amazing, and I can't wait for March....

I am adding this of course to Tim's February challenge

Thank you for visiting and I always love to read all your wonderful comments, thanks so much for those too!!!

Related Posts Plugin for WordPress, Blogger...

One World One Heart

Photo

FEEDJIT Live Traffic Feed

Birthday Card

Birthday Card
Just got a whole lot of new stamps from a brilliant place called the Stamp Smith. This is the image that I first saw on Docraft and really liked. I asked the friend who has used it in an ATC, where she got it. Well she borrowed it from a friend who got it from ebay as a one off. But.... it had a title. I googled the title, and hey presto found the site. They have great stamps and offer a really friendly fast service. I highly recommend them!

Gothic Arch Trifold inside

Gothic Arch Trifold inside

Back of Gothic Arch Trifold

Back of Gothic Arch Trifold

Gothic Arch Within the Heart

Gothic Arch Within the Heart

Gothic Arch, the Key

Gothic Arch, the Key