Monday 20 February 2017

Wish Upon A Star banner for Shimmerz

Hi friends, I have a post going up on the Shimmerz blog today, so just a little preview here:
I hope you'll take the time to hop over, but even if you don't, your visits here are always appreciated! Thank you!
xxxxx

Tuesday 14 February 2017

Dream Joy and happy valentines

Hello friends, thanks for dropping in her!
Just a quick post to wish you  a Happy Valentines. Hope you will spend today surrounded by loved ones!
With this journal spread, I decided to embrace my softer side and used light, Springlike colours, rather than my usual grungy textural stuff.

I did a massive craft-room clear out recently, and re-found so many products that had not seen the light of day for ages, so I used some of those on this spread.
The background was created with Gelatos over a gessoed page. I blended with my fingers and then used stencils with a baby wipe to lift colour and add some in again.
I have a huge collection of vintage images, so decided to utilize some of those on this page too.

Some background stamping, using some recently purchased Paper Artsy stamps
An image fussy cut from one of my own design papers, (I'll share it below, even though I'm fairly sure I shared it once before)
And finally some stencilled words to act as the main focal point.

Well, that's it, thanks for your visit and below your freebie as a little Valentines gift to you...

Wednesday 8 February 2017

February planner pages and freebies

Hello everyone and like always thanks for dropping in!
I am a little late with posting my February pages for my planner, but hey ho, better late than never and life has been a bit crazy and this is just the first chance I have had.... In case you missed it, you can see my January pages HERE. I have adapted and tweaked my planner so it is more useful.
Here are a few samples:
The January title page, mostly using leftovers from my Graphics 45 Place in Time collection.
Whereas my January daily planner pages were all on loose sheets that I kept in a special folder, I thought I would bind my February day planner pages into a little booklet. I printed the papers I designed on two sides and then just bound them together creating a few signatures. I specially kept the pages quite plain, so that I can do stamping, stencilling and over printing with   planner  print outs (downloaded from the web and adapted to suite my personal needs).
Here you can see one of the inside pages. Because of lack of time they are actually all the same. So far this method has worked well for me.
Here you can see my weekly pages (still have to finish week 4)

And here is one of my meal planner pages. For January I had made grocery lists too, but that proved impractical. Afterall, who wants to take a planner along when they go grocery shopping. I just look at my meal plan and make my weekly list on a piece of paper. (Wished I was clever enough to do it on my phone lol).

Anyway, that's it for now. Below you will find most of the papers I used which you can download if you like them and want to use them for whatever you wish. - Enjoy!


Apart from the first one (which I designed to be the cover of my day plans) the others are all designed so they can be printed on A4 (8.5 / 11) paper in landscape orientation.

Well that's it for now, like always you can use my papers in whatever way you like, you can sell what you make, just don't sell the papers as they are..

Monday 6 February 2017

Queen of Hearts for Shimmerz

Hello friends hope you are all ok.
Just a preview day here today:
If you want to see more of this journal page, you will have to hop over to the Shimmerz blog, and for those of you who do, I really appreciate it!!
xxxxx

Friday 3 February 2017

Words That Are Special

Hello friends and lovely to have you drop by! It's the first Friday of the month and that means a new challenge at A Vintage Journey
The lovely Jennie is our host and the theme she chose is Words That Are Special. This is what Jennie had to say about the challenge:
We often use words for cardmaking, scrapbooking, journaling, layering backgrounds, stamping, collage, in mixed media work, on our tags …. In fact words are often an integral part of our design processes for many of our projects. This month show us words that are important or special to you and how you incorporate them in your vintage; shabby; mixed-media; art journaling; industrial or steampunk art.
Well I love words and decided to make a fold-out card with 4 panels with some of my favourite sayings. It's based on a project that I found on Pinterest. Here are the different panels:
I have written a quick tutorial of how to make this, and of course you can decorate it in whatever way you wish. The base of mine is Kraft Card. This is what you will need:
A3 card for the front, back an inside strip and the backing of your inside panels
White card for the front and back, inside covers and panels.
A selection of paints, inks, stamps etc

Method
1. Fold A3 card in half along the long side, this gives you an A4 folded card. (8.5 by 11 approx)
2. Cut this in half giving you a folded card panel that is 21 cm wide and 14.7 cm high (8" by 5 3/4 approx)
3. From the remaining card cut a strip along the long side about 4 cm high (1.5" Approx)
Fold this strip concertina style.
4. The inside panels can be any size that fits inside the covers, I made mine 11.5 cm high and 9 cm wide (4.5 x 3 3/4 " approx).
5. Create panels for the covers, inside covers and inside cards in what ever way you wish
6. Adhere to covers and insides.
7. Glue concertina fold strip in place and then adhere your 4 inside cards.
Hope my description makes sense. Below I will show you how I decorated mine with paints, inks, stencils and stamping.
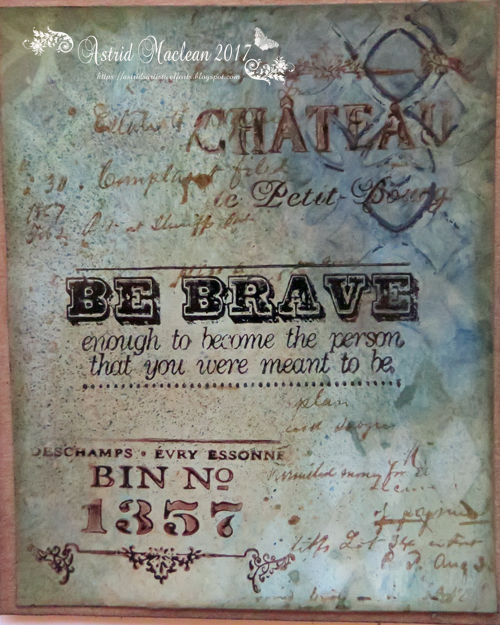
Front cover using stencils by Tim Holtz and Andy Skinner, Decoart Media acrylic paints, Distress Crayons and Infusions.

Stamps by Tim Holtz, coloured with Big Brush Pens
Back cover, using similar techniques.
Stamps by Wendy Vecchi, some doodling with white pen and a Tim word sticker.
Inside left , using Distress inks and stamps and stencils by Tim and Andy Skinner

Inside right  same thing. These insides will be mostly covered by the fold out cards of course....
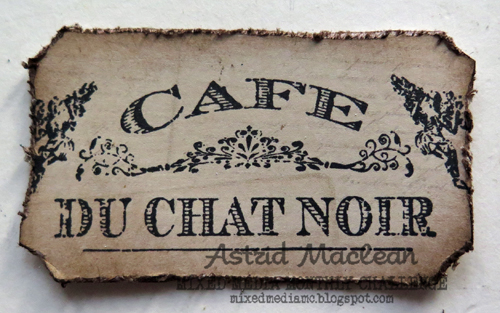
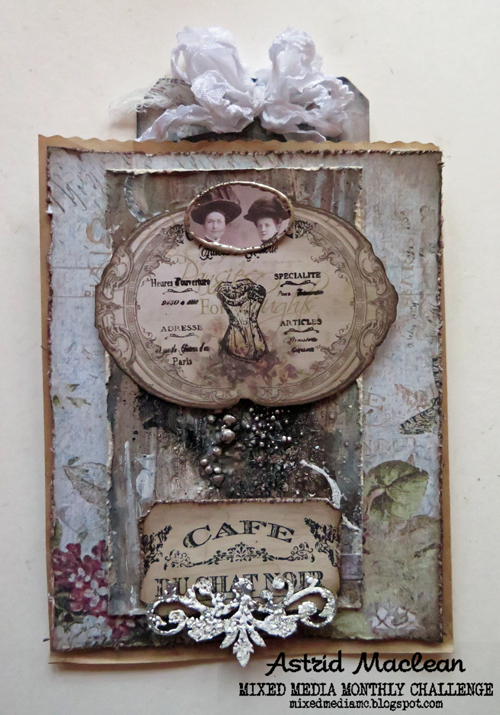
And here some close ups of the inside cards, all done in a similar way, using Distress inks and stamps from various sets by Tim Holtz.


I changed the colour ways subtly to go along with the background of the covers.

Well, that's it, I had great fun putting this together and will definitely make more of these, you could use it and put tags inside, or even use the panels as photo mats and make a little brag-book or something.

Do make sure to check out what my talented teamies have made for this challenge if you have not done so already and get all the details of the challenge this month, all you need to do is CLICK HERE

Hope you will join in with our challenge and have a wonderful weekend!!

Wednesday 1 February 2017

Shabby Grunge for Mixed Media Monthly

Hello dear friends and followers, I hope you are keeping well and happy February!
It's the first of the month, so that means a new challenge at Mixed Media Monthly.
Here is what I made:
It's an altered brown paper bag with a matching tag to fit inside. It can be used as a gift for a crafty friend, specially when you add some crafty goodies in the bag as well.
Our sponsor is no other than....... STAMPENDOUS,  home to fabulous stamps, stencils amazing embossing powders, stencils and more.
No automatic alt text available.
And here is our badge for this month:
Make sure to add it to your post if you decide to play in our challenge.

Alright, onto my project:

I started with a size 8 tag, coloured it with a mix of acrylic paints, background stamping (using the stamp set, generously provided by Stampendous, Andy Skinner Shabby Chic set). I added some Dreamweaver silver embossing paste through a stencil and added more texture with  Shabby White Blanc EP.

Next I stamped one of the stamps onto a piece of scrapbook paper, fussy-cut and mounted it onto my tag with some other bits and pieces from my stash.
Onto the bag:
I took a bit of scrapbook paper, cut it to the size of the bag, distressed the edges and did some second generation stamping using the same stamp set.
Next I created a background panel in a similar way to the tag, this time adding texture with Ancient Silver EP, some art stones and bits of thread.
Next I created some embellishments for my bag.I stamped some more images, this one on a little pre printed label which I had fussy cut first.
Another one on a little ticket.
A little antique photo which I edged with Ancient Silver EP
A chipboard piece made shabby with some more of the white EP
And voila, the finished bag.
Below you can see how the tag just fits perfectly inside:
Well, like always our sponsor is providing a generous prize for our chosen winner, so of course we all hope you will play along. Do check out the amazing projects my teamies have created and get all the details of the challenge by clicking HERE

Related Posts Plugin for WordPress, Blogger...

One World One Heart

Photo

FEEDJIT Live Traffic Feed

Birthday Card

Birthday Card
Just got a whole lot of new stamps from a brilliant place called the Stamp Smith. This is the image that I first saw on Docraft and really liked. I asked the friend who has used it in an ATC, where she got it. Well she borrowed it from a friend who got it from ebay as a one off. But.... it had a title. I googled the title, and hey presto found the site. They have great stamps and offer a really friendly fast service. I highly recommend them!

Gothic Arch Trifold inside

Gothic Arch Trifold inside

Back of Gothic Arch Trifold

Back of Gothic Arch Trifold

Gothic Arch Within the Heart

Gothic Arch Within the Heart

Gothic Arch, the Key

Gothic Arch, the Key